OUTLINE:
Brake Light Inspection: How to Replace the Brake Lights
 195
195The brake light is a vehicle indicator light. When the vehicle in front of you brakes, the brake light will light up. This will serve as a warning to the vehicle behind you to avoid rear-end collisions, especially on high-speed roads. Therefore, the brake light is still very important. If it is not lit or broken, the problem must be solved in time. We must know how to have a brake light inspection.
Types of Brake Light
Brake lights are generally divided into two categories, three in total.
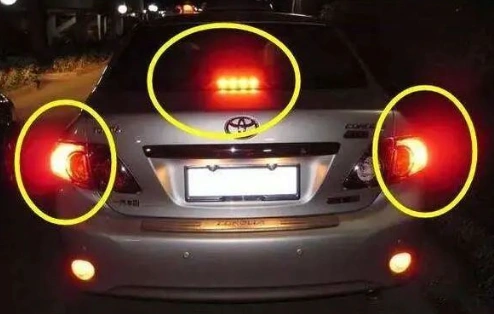
One is the brake lights installed at the two ends of the rear of the car, which is a type of car rear light, one on each side.
The other is the high-mounted brake lights, which are installed above the rear of the car.
If cars and micro cars with lower chassis do not have high-mounted brake lights installed, drivers of trucks, coaches and buses with higher chassis will easily miss them, leading to rear-end collisions, and the consequences are very serious, so many vehicles are now equipped with high-mounted brake lights.
How to Check Brake System
Generally, the most intuitive way to check a car's lighting failure is to look at the fault indicator light on the car's dashboard. The vehicle will perform self-inspections when it starts and during driving, and will give a prompt on the dashboard when a lighting failure is detected. This is the most direct way for us to know if the brake lights are damaged.
However, the brake light fault check prompt function is more common in luxury models, and most ordinary vehicles do not have it, so we need other methods to judge.
But in reality, we drive alone most of the time. When we drive alone without the help of relatives and friends, do we have other ways to judge?
The answer is yes!
We need to find a reference object. The best effect is when the light is strong at night. When parking at night, we can find a wall as a reference. When we step on the brake light, the light will be directly reflected on the wall. We can observe the light reaction and intensity when we step on the brake through the rearview mirror inside the car to judge whether the brake light is normal.
If the light does not flash during the process of stepping on the brake and releasing the brake, it means that there is a problem with the brake light. If the light on the left is dark and the light on the right is strong, it means that the left brake light is broken. This method is also very simple and practical.
10 reasons for brake light on
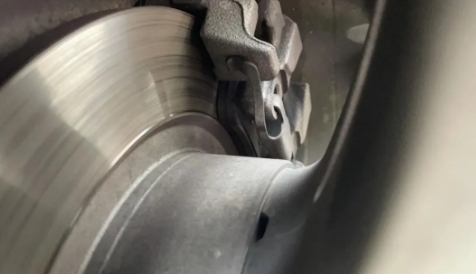
1. The brake pads are seriously worn. The brake pads will gradually wear out during use. When they reach a certain limit, the brake lights will become brighter.
Solution: Check the brake pads regularly. If you find that the brake pads are seriously worn, you need to replace the brake pads in time.
2. The brake oil is too little. During the braking of the vehicle, the brake oil plays a very important role and can be compressed into the brake pipes and the master cylinder. If the brake oil is too little, the oil level sensor will detect it immediately, and then the brake lights will be on all the time.
Solution: Check the brake oil and add it in time.
3. The alarm circuit is short-circuited.
Solution: Repair the alarm circuit.
4. The ABS pump is damaged.
Solution: Replace the ABS pump
5. The handbrake is not released or the switch is short-circuited
Solution: Check and repair the handbrake.
6. The brake light switch on the brake pedal is damaged.
Solution: Replace the brake light.
7. There is an abnormality in the brake circuit. When the brake circuit is abnormal, the brake light will be on all the time.
Solution: Make a comprehensive inspection of the brake pads and other circuits. Once an abnormality is found in the circuit, repair it in time.
8. The rear light bulb circuit is short-circuited.
Solution: Repair the rear light bulb circuit.
9. There is a problem with the ABS sensor.
Solution: Replace the ABS sensor.
10. The brake switch is damaged. In this case, the brake pedal has poor contact with the brake sensor switch or the sensor switch is damaged.
Solution: Disassembly and inspection are required.
Brake light inspection
Turn off all lights and step on the brakes. If you can see the following uniform and bright light from the left, middle and right rearview mirrors, it means that the brake lights are also in good condition.
Regular inspection
As a car owner, you must develop the habit of regular inspections, because good methods can only play a role, and the most subjective factor still comes from the owner's behavior habits. The inspection cycle is recommended to be once every three months, because we usually do maintenance once every six months, and the maintenance items also include light inspections. In this way, we have one more inspection during the maintenance period and one less driving risk. At the same time, we also want to remind everyone that if the brake lights are damaged and not repaired in time before driving on the road, it is a traffic violation.
How to Replace the Brake Lights
If you unluckily find that your near light doesn’t work through brake light inspection. Don’t worry, it’s easy to replace the brake lights by yourself.
Step1 Remove the expansion screws
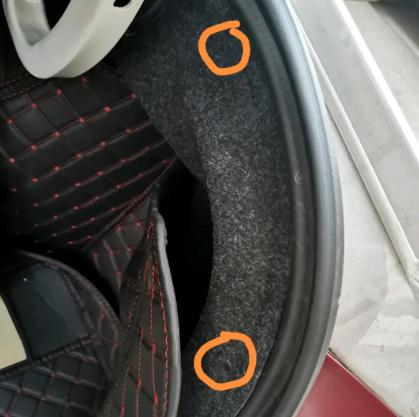
Firstly, remove the expansion screws of the trunk mat with a hexagonal screwdriver, so that you can lift the mat and find the fixing nuts for removing the headlights. Generally, you only need to remove the two nuts near the rear lights on one side. Of course, different cars are different, so you can remove them according to the actual situation of your car.
Step 2 Remove the nut
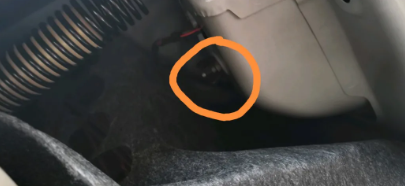
After removing the fixed expansion screws, lift the padding, find the nut that fixes the headlight, and remove it. In this way, the headlight can slowly move outward a certain distance. At this time, you must be careful to move slowly and not to break the power supply line.
Step 3 Remove the rear headlight
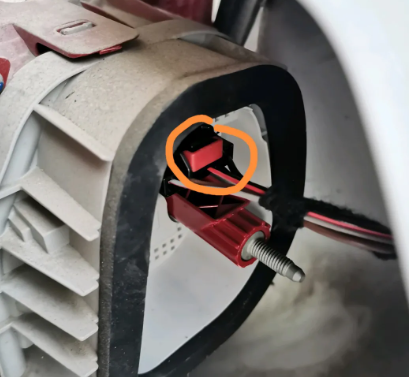
After the headlight is moved a certain distance away, reach in, pull the red buckle outward, gently pull the power cord, and the rear headlight will be removed.
Step 4 Find where the light bulb is
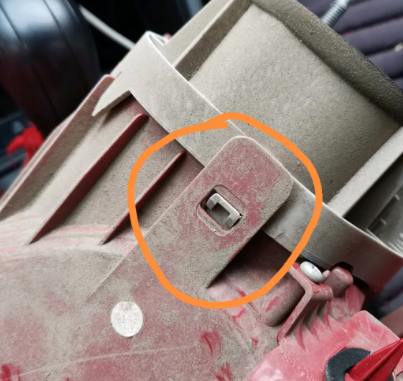
After removing the rear light, you need to see the bulb. At this time, you need to open the plastic buckle. You can gently bend it upward from the bottom. You can use a flat screwdriver. In this way, you can open all the buckles and see the bulb. Note: Do not disassemble it violently, otherwise it will not be able to be put back.
Step 5 Install the new brake light
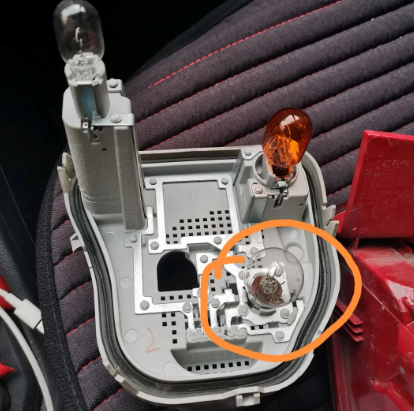
After opening it, the big bulb is the brake light. If you are not sure, you can connect this circuit board to the car and distinguish which bulb is the brake light by stepping on the brake, turning on the running light, and turning on the turn signal. The way to remove this bulb is to hold the bulb and rotate it counterclockwise to remove it. The way to install a new LED bulb is just the opposite. Find the small protrusion on the side, find the opening and gently press it down, rotate it clockwise, and it is installed.
Step 6 Check the light
Replace the original lamp with an LED lamp. After checking that it can be lit, snap the clip into place, connect the power line, and perform the opposite operation to the original one to successfully complete the replacement of the bulb.

Disclaimer: The views and opinions expressed by individual authors or forum participants on this website do not represent the views and opinions of Chipsmall, nor do they represent Chipsmall's official policy.

share this blog to:

