OUTLINE:
A Guidance to Microphone Parts DIY
 303
303Hey, do you know how the microphone you love so much is made? Ever wonder how those little things in there help catch that great sound?
Image Source:Microphone-Parts.com
Here, here, here, here is a super simple manual on microphone parts, let's take a look at what's hidden inside the microphone, and tell you what they do.
Whether you are an audio nerd or a DIY enthusiast who loves to fix things, this manual can help you. Let's step into the world of microphones and see how each widget works together to create those sounds that we find pleasing!
What Is the Definition of Microphone Parts
Microphone parts, to put it bluntly, are the microphone belly of those small partners, they work hand in hand, heart to heart, work together.
Whenever there is a sound floating over, they are busy opening, first there is a little guy called the diaphragm, it is very sensitive, when hearing the sound, it will gently tremble, like dancing. This dance is then transformed into an invisible energy, an electrical signal.
Next, the electrical signal is still very weak, just like the sound of a little cat, and an amplifier brother needs to help it strengthen its courage and make the sound louder, so that the outside equipment can hear it clearly.
In this process, the microphone's shell is like their umbrella, regardless of whether the outside is wind and rain or noisy, they can be safely protected inside, undisturbed.
What Are the Components of A Microphone
Diaphragm (or membrane) : These are super sensitive patches in a microphone, like the eardrum in your ear. When you speak or sing, the sound makes the patch vibrate.
Magnets and coils (if it's a dynamic microphone) : Imagine a small coil in the middle of a magnet, the diaphragm moves, the coil moves back and forth in the magnet, and when it shakes, it produces an electrical signal, so that the sound is "turned" into an electrical signal.
Electret and capacitor (in the case of a capacitive microphone) : There is a small charged film (electret) and a metal sheet (the other side of the capacitor) with a small space between them. When the diaphragm vibrates, the size of the space changes, and the amount of electricity in the capacitor changes, so that the sound is "captured".
Circuit boards and small chips (FETs) : A circuit board is like the brain in a microphone, with many small chips and small parts on it. One particularly important one is the FET (field-effect transistor), which is responsible for amplifying the weak electrical signal coming from the diaphragm or capacitor, making it stronger so that we can hear the sound clearly.
Other small parts: There are also some small rings, small pieces of glass, which are to help the microphone work better. Windshields and windshields, for example, are designed to reduce the wind so that when you talk, the wind doesn't whoop in the microphone.
Enclosure: Finally, there is a shell outside the microphone, which is like a small house to protect all the parts inside, but also to prevent outside noise interference with the microphone work.
An Introduction to Microphone Parts Name&Function
Let's talk about the parts in the microphone,their names and what they're capable of:
1. Diaphragm (diaphragm)
Function:
Sound sensing: It is the "ear" in the microphone that senses sound and vibrates accordingly.
Converting signals: Converting the vibrations of sound into electrical signals is the first step in turning sound into an electronic sound that we can hear.
2. Magnetic core and coil (exclusive for dynamic microphone)
Function:
Magnetic field effect: The magnetic core generates a magnetic field to provide a working environment for the coil.
Signal generation: When the diaphragm vibrates, the coil is driven to move in the magnetic field, thus generating an electrical signal. This process is like dancing in a magnetic field, dancing out the radio waves of sound.
3. Electret and capacitor (unique to capacitive microphone)
Function:
Electrostatic induction: Electrets are electrically charged films that keep the charge stable.
Distance change detection: Sound causes the distance between the film and the capacitor plate to change, and this change is converted into an electrical signal. It's like a distance measurement game, except here we're measuring tiny changes in sound.
4. Circuit board and Field effect transistor (FET)
Function:
Signal processing: The circuit board is the "brain" inside the microphone, responsible for receiving, processing and transmitting signals.
Signal amplification: The FET, as a key component, is responsible for amplifying weak electrical signals so that they can be clearly recognized and processed by external devices. Without it, our voices might be as quiet as mosquitoes.
5. Other auxiliary components
Function:
Protection: The shell protects the internal components from external damage, while providing a certain electromagnetic shielding.
Reduce noise: Windshields and certain designs can reduce unnecessary noise such as wind noise and breathing sound and improve recording quality.
Structural support: The grid conductive ring, the grid insulating ring and other components provide structural support to ensure the stable connection and correct position between the components.
Microphone Parts Diagram[For Reference]
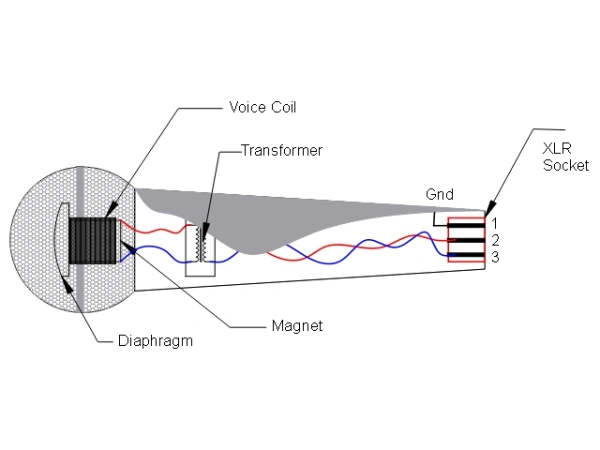
Image Source:Terralec
The diagram above clearly shows the structure of a microphone. In order to further learn about it,you can click the link here:Terralec
Building a DIY microphone can be a fun and educational project. Here’s a detailed guide on how to make a basic dynamic microphone, which is relatively straightforward and requires minimal components:
How to DIY Microphone[In Detail]
Material preparation
Microphone components: You can use a small dynamic microphone component that you can buy online or remove from an old microphone.
Metal mesh: Used as a microphone shield.
Plastic or metal housing: for holding microphone components.
Wire: Connect the microphone element to the output.
Connector: Depending on your preference, it can be an XLR connector or a 3.5mm jack.
Soldering iron and solder: Used to connect wires.
Screws and nuts: used to secure microphone components.
Glue: such as epoxy resin glue or super glue.
Optional: Foam or fabric, used as a blowout preventer.
Tools required
Screwdriver: Used to assemble shells.
Electric soldering iron: used for connecting wires.
Wire cutters and wire strippers: for handling wires.
Electric drill: Drill holes in the housing if necessary.
Pliers: For bending and shaping metal parts.
Steps to make a dynamic microphone:
Prepare the shell:
Choose a housing material, small metal tube or plastic tube.
Drill or cut holes in the housing for microphone components and connectors. The holes should be slightly larger than the components and joints to ensure that they are securely secured.
Install microphone elements:
There are two or three terminals on the microphone element (dynamic microphones are generally two: a signal terminal and a ground terminal).
Put the microphone element in the housing, secure it, but leave enough room for sound to come in through the shield.
Prepare the joint:
If using a 3.5mm jack or XLR connector, solder the corresponding pin first. Usually the ground wire is connected to the sleeve or pin 1, and the signal wire is connected to the tip or pin 2.
If your microphone element has a shield, remember to connect it to the ground wire of the connector.
Wires connected to microphone components:
Solder the wire from the terminal of the microphone element to the corresponding pin of the joint. Make sure the weld is secure and doesn't short circuit.
Install the Metal Mesh:
The metal mesh acts as a grille to protect the microphone element from dust and damage while allowing sound to reach it. Secure the mesh over the microphone element using adhesive or by fitting it into the casing.
Assemble the Casing:
Once everything is connected and secured, assemble the casing. Make sure all components are properly aligned and that there are no loose parts.
Test the Microphone:
Plug the microphone into an amplifier or sound system to test it. Speak or make noise near the microphone to check if it’s picking up sound properly. Adjust the positioning or connections if necessary.
Finishing Touches:
Optionally, you can add a pop filter (a piece of foam or fabric) to reduce plosive sounds. Attach it to the grille or place it in front of the microphone.
Troubleshooting Tips:
No Sound: Check all connections to ensure they are properly soldered and secure. Make sure the microphone element is positioned correctly.
Low Volume: Ensure the microphone element is functioning correctly and that the casing does not have any sound-blocking materials.
Noise Interference: Make sure all wires are insulated properly and that there is no short circuit.
FAQs: When Should You Replace A Microphone Part
Here is an explanation of when you should make a decision on replacing the microphone parts:
Mike Thunder (Capsule) :
That little guy on the mic, that's Mike. If you notice that the voice has diminished, or it sounds wrong, there is a murmur, or it looks cracked or concave, it needs a new one.If you use it a lot, it will wear out over time, so get a new one every now and then and the sound will always be great.
Microphone cable:
This wire connects the microphone to the sound equipment. If the sound is staccato, or if it's sizzling, then check the line. If you see that the skin of the thread is broken, or the thread inside is exposed, that is the thread is broken. Also, if the connector is loose or broken, it has to be replaced.
Microphone mesh cover:
This mesh protects the microphone from breakage and dust. If it's bent, sunken, or too dirty to clean, it needs a new one. So the microphone looks new and the sound is clear.
Shockproof frame:
The shockproof frame is to prevent the microphone from being swayed or making noise against things. If the elastic strap inside or the thing that holds the microphone in place is old, then the shock-proof frame won't work. If you see a crack or a broken shelf, you need a new one.
What Are the common problems occurring on your DIY Microphone
Common problems with DIY microphones include:
No Sound: Check for loose connections, a faulty microphone element, or a damaged cable.
Low Volume: Verify proper placement of the microphone element and check if the capsule needs replacing.
Distorted Sound: Look for electrical interference or a damaged capsule.
Background Noise/Hiss: Ensure wiring is shielded and grounded properly.
Intermittent Sound: Inspect for faulty connections or a damaged cable.
Physical Damage: Repair or replace broken grilles or casings.
Feedback: Adjust microphone placement and check for proper shielding.
Power Issues (Condenser Mics): Test the power supply and connectors for faults.
Final Verdict
To build your own microphone, you need to understand several key components and parts, each of which is particularly important to the effectiveness of the microphone.
You have to carefully pick, carefully install, such as microphone core, wire, mesh cover, connector these.
If the sound is bad or the microphone is knocked, you have to be able to fix it.
After finishing, it is necessary to maintain and check frequently, so that the microphone can always be used.
As long as you are careful and the method is right, the microphone you made by yourself can provide you with a stable and good voice on a variety of occasions!
Disclaimer: The views and opinions expressed by individual authors or forum participants on this website do not represent the views and opinions of Chipsmall, nor do they represent Chipsmall's official policy.

share this blog to: