


OUTLINE:
3 Steps To Connect MC4 Connector
 252
252The MC4 connector is one of the most commonly used photovoltaic module connectors today, and it adopts a plug-in design to provide perfect electrical connection and protection all at once. Now, with the help of the guide, let us have a look at the steps to connect the MC4 connector!
In order to properly install the MC4 connector, please perform the following steps, hoping the mentioned tips will help you. During the operation, remember to pay attention to your safety and avoid possible dangers and damages.
Preparation For Effective Connection
Before the practical connection, the first step is to do some preparation work. The following tools and materials are necessarily required to assemble the MC4 connector:
- MC4 Connector: The core component that will be used in the next assembly process for connecting solar panels. The MC4 connector is a multi-contact, 4 mm diameter connector that ensures a safe and reliable electrical connection.
- MC4 crimping clamp: A professional tool for crimping MC4 connectors. It can quickly and safely press the wires to the terminals of the MC4 connector.
- Wire strippers: A tool used to remove the insulation layer of the wire in order to insert the wire into the connector.
- Wire stripping blade: This is a part of the wire stripper used to strip the insulation layer of the wire.
- Solar cable: A cable used to connect solar panels, usually with a specific specification (such as 2.5-6.0 mm²) in order to be compatible with the MC4 connector.
The above tools and materials are all necessary to assemble the MC4 connector, and they can help you properly install and connect the solar panels to ensure the stable and efficient operation of the MC4 connector.
The Assembly Process Of MC4 Connector
The working principle of the Mc4 connector is mainly to ensure the correct polar connection through the design of the metal pins and slots between the female connector and the male connector. This means that only connectors of the same polarity can be inserted and matched to the corresponding slot. And the assembly process of it is simply divided into 3 steps as follows.
Crimp The Cable
To crimp a cable with an MC4 connector, you can refer to the following tips.
Firstly, remove the insulation outer layer of the cable with a wire stripper, and ensure that the length of the exposed wire is suitable, generally 2-3 cm.
Secondly, it is time to place the stripped cable into the wrapping ring of the MC4 terminal, and press it tightly with crimping pliers.
Then, use the crimping pliers to cut off another wrapping ring for secondary crimping.
Next, make sure the cut wrapping ring is crimped again with crimping pliers near the first crimping joint.
Lastly, by crimping the wrapping bit twice, the terminal and cable are not only fixed to stabilize the electrical performance but also to improve the tension at the terminal, increasing the firmness at the terminal connection, so as to improve the anti-compressive creep performance at the terminal connection.
All the above are the basic methods of crimping MC4 connectors and cables, but in actual operation, there is a need to adjust according to the specific situation and device requirements.
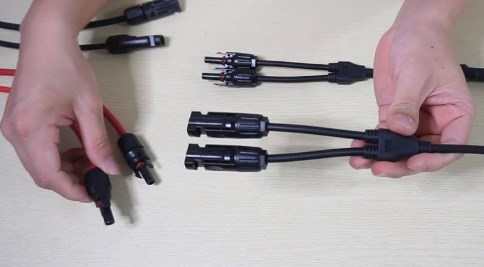
Plug In The Connector
After crimping the cable, the next crucial step of the whole connecting process lies in the plugging in the connector, that is, to insert the positive and negative metal terminals into the positive and negative connectors respectively.
To be more specific, the initial need is to prepare a DC input line. This is the basis for connecting MC4 connectors, so make sure the quality and length of the cable meets your needs.
Then, the crimped positive and negative metal terminals must be inserted into the positive and negative sockets of the MC4 connector respectively, ensuring that the positions of the connectors are all correct. Otherwise, it will cause poor contact, affecting the normal operation of the photovoltaic system. This step is the core of the whole process of connection, and it is necessary to ensure the mapping between terminals and connectors.
Clamp The Connector
The last step of the connecting is to tighten the lock nuts of the positive and negative connectors, ensuring that the connector will not loosen during application and guarantee the stability of the connection. In addition, there are also some special MC4 connectors, such as a bracket that is easy to secure the MC4 connector, which is designed to make the MC4 connector more stable after installation.
However, it should be noted that when installing and fastening MC4 connectors, the polarity of the cables should be correct and labeled accordingly. After the connector is tightened, there is also a need to use a multi-meter DC gear (measuring range is not less than 1100V) to test the system, assuring that the connection is tight and will not fall off.
Attention For Connecting MC4 Connector
When operating the installation and connection of the MC4 connector, there are also a few things to be aware of, in order to avoid injuries or damages during the course.
Firstly, be sure that the connectors are produced by the same manufacturer or the inverter manufacturer. Connectors of different manufacturers are prohibited from interconnecting, for which the wrong connection of different products will lead to increased contact resistance, thereby reducing power generating efficiency. Meanwhile, improper insertion can also result in increased leakage current and reduced creepage distance, which may lead to the risk of electric shock.
Additionally, it is wise to choose the recommended model or consult dealer to obtain the relevant model, but pay attention that not all crimping pliers are suitable for photovoltaic connector crimping.
Next, after the assembly process of MC4 connector, it is time to use a multi-meter to measure the voltage between the positive and negative poles in DC mode (measuring range not less than 1100V). If the voltage is negative, it shows that the DC input polarity is incorrect, and the polarity needs to be rechecked and corrected. Or, if the voltage is greater than 1100V, it means the PV modules are too high and it need to be reconfigured.
The above are the tips that need to be paid attention to when connecting and using MC4 connectors, and I hope the guide can help you.
Final Verdict
The working principle and structural design of the MC4 connector make it widely used and adopted in photovoltaic systems. MC4 connectors can be found in many important components of photovoltaic power generation, such as bus boxes and inverters, and they take on great responsibility for the successful connection of the power station.
Disclaimer: The views and opinions expressed by individual authors or forum participants on this website do not represent the views and opinions of Chipsmall, nor do they represent Chipsmall's official policy.

share this blog to: