OUTLINE:
How to Test a Potentiometer? Only 5 Steps
 229
229A potentiometer is a type of variable (adjustable) resistor. Potentiometers are widely used to control the output of electrical devices (e.g. volume of a radio or amplifier, speed of a toy or tool, lighting levels, etc.). Its main function is to resist or reduce electric current. In this passage, we are going to show you how to test a potentiometer step by step.

Tools Needed to Test a Potentiometer
These are tools needed before you actually get down to the testing procedures:
Multimeter
Amultimeter is used to measure the resistance across different parts of the potentiometer and check for any irregularities or faults.
.webp)
Small Jumper Wires (If Needed)
Small jumper wires can be used to establish a temporary electrical connection between different points in a circuit.
How to Test a Potentiometer in 5 Steps
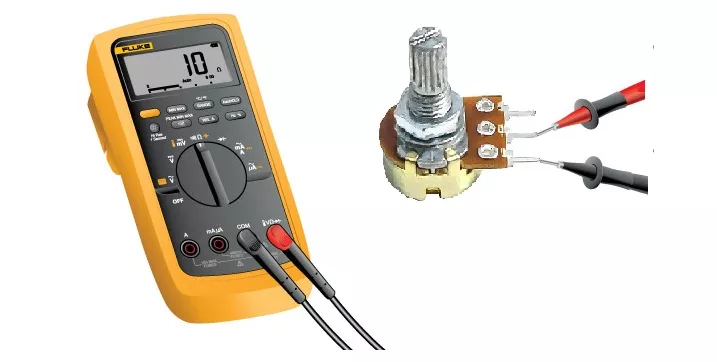
Testing a potentiometer involves checking its resistance values and ensuring smooth and consistent operation. Here's a step-by-step tutorial on how to test a potentiometer.
Step 1: Set Up the Multimeter
Turn on your multimeter and set it to the resistance (ohms) mode. If your multimeter has an auto-ranging feature, it will automatically select the appropriate range. Otherwise, manually set the range to a value higher than the expected resistance of the potentiometer.
Step 2: Identify Potentiometer Terminals
A potentiometer typically has three terminals: two outer terminals and a center terminal (wiper). Identify these terminals on your potentiometer. The outer terminals are usually connected to the ends of the resistive track, and the center terminal is connected to the wiper.
Step 3: Measure Resistance
Connect the multimeter leads to the outer terminals (across the entire potentiometer). Rotate the potentiometer knob through its entire range and observe the multimeter reading. The resistance should change smoothly and consistently. If the resistance reading is constant or varies erratically, the potentiometer may be faulty.
Step 4: Check Resistance Across the Wiper and One Outer Terminal
Connect one multimeter leading to the wiper (center terminal) and the other leading to one of the outer terminals. Rotate the potentiometer knob and observe the multimeter reading. It should vary smoothly. If the resistance is constant or exhibits erratic behavior, the potentiometer may be faulty.
Step5: Visual Inspection
Inspect the potentiometer for any physical damage, burnt areas, or loose connections. Ensure that the potentiometer knob turns smoothly without any unusual resistance.
[Must Know] Notes on How to Test a Potentiometer
To make sure you test the potentiometer successfully, these are notes you should pay special attention to:
- If the potentiometer is part of a circuit, disconnect it before testing to isolate it from the rest of the components.
- If possible, refer to the potentiometer's datasheet for specifications and expected resistance values.
- Always follow safety precautions when working with electrical components. If you are unsure or uncomfortable performing these tests, consider seeking assistance from someone with experience in electronics.
How Do I Know If a Potentiometer is Bad
To determine if a potentiometer is faulty or "bad," you can perform a series of checks. Here are some signs that may indicate a potentiometer is defective.
1. Inconsistent Resistance
Measure the resistance across the entire range of the potentiometer by connecting the multimeter leads to the outer terminals. The resistance should change smoothly as you turn the knob. If the resistance is constant, fluctuates erratically, or has dead spots, the potentiometer may be faulty.
2. Uneven Resistance Across Terminals
Measure the resistance between the center (wiper) terminal and each outer terminal separately. The resistance should vary smoothly and consistently. If there are abrupt changes or irregularities, the potentiometer may be faulty.
3. Open Circuit or Infinite Resistance
If the multimeter reads an infinite resistance (or open circuit) across the terminals, it indicates a break in the resistive track. This can happen if the potentiometer is physically damaged or worn out.
4. Short Circuit
If there is a short circuit between the terminals (near zero resistance), it indicates a potential internal short within the potentiometer, possibly due to a manufacturing defect or wear.
5. Physical Damage
Inspect the potentiometer for any physical damage, such as burnt areas, broken tracks, or loose connections. Visible damage may be a clear indication of a problem.
6. Erratic Behavior
If the potentiometer produces erratic behavior when adjusting the knob, such as sudden jumps in resistance or unexpected changes, it suggests a problem with the internal components.
7. Unusual Resistance Values
Compare the measured resistance values with the potentiometer's specified range. If the readings are significantly outside the expected range, it may indicate a problem.
8. Stiff or Difficult Rotation
A potentiometer knob should turn smoothly. If you experience stiffness, resistance, or difficulty in turning the knob, it may suggest mechanical issues or wear.
9. Aging and Wear
Potentometers can wear out over time due to usage. If the potentiometer is old and has been heavily used, it may be more prone to failure.
Final Verdict
In this passage, we show detailed steps on how to test a potentiometer and ways to know if a potentiometer is bad. By following the given procedures, hopefully, you will get the hang of it. Don't forget to consult the experienced if you run into any troubles in this process.

Disclaimer: The views and opinions expressed by individual authors or forum participants on this website do not represent the views and opinions of Chipsmall, nor do they represent Chipsmall's official policy.

share this blog to:

